Are you looking to make a few extra bucks from your WordPress site? Or maybe you just want to neatly place ads without it being a headache? Well, you’re in the right spot! Today, we’re diving into the Ad Inserter plugin—a handy tool that makes managing ads on your website as easy as pie. Whether you’re a seasoned blogger or just starting out,this guide will walk you through the ins and outs of using Ad Inserter,so you can focus on what realy matters: creating great content. So grab a cup of coffee and let’s get started!
Table of Contents
- Getting Started with the Ad Inserter Plugin and Why You Need It
- Setting Up Your First Ad Block: A Simple Walkthrough
- Mastering Ad Placement: Tips for Maximum Impact
- Troubleshooting Common Issues with Ad Inserter
- Exploring Advanced Features for Better Control Over Your Ads
- Q&A
- In Retrospect
Getting Started with the Ad Inserter Plugin and Why You Need It

If you’ve got a WordPress site and want to make some extra cash, the Ad Inserter plugin is a game changer. This little tool makes it super easy to add ads wherever you want on your website without breaking a sweat.Whether you’re putting ads in the sidebar,between posts,or in the header and footer,Ad Inserter lets you manage it all in one place. You don’t need to be a tech genius; just a few clicks and you’re good to go!
One major reason to use this plugin is its flexibility. You can choose from different ad formats, whether it’s plain text, images, or even video ads.Plus, you can control where and how often ads appear. Want to show certain ads only to dedicated readers or only on specific posts? No problem! The plugin lets you set up conditions for the ads so they can be as targeted as you need.
Another cool feature is the built-in code editor. If you’re comfortable with HTML or JavaScript, you can easily tweak the ad code right from the plugin interface. this is a huge advantage since it means you can customize your ads to fit your style and brand without having to mess around too much with your theme’s code. Just imagine being able to edit everything right from your dashboard!
Honestly, if you’re serious about monetizing your site, using something like Ad Inserter is almost a no-brainer. It saves you time, is user-pleasant, and can help you increase your revenue without a lot of hassle. not only does it offer a straightforward setup,but it also provides detailed analytics to help you track how well your ads are performing. Whether you’re a newbie or have been doing this for a while, you’ll appreciate how much easier this plugin makes it to manage your advertising strategy.
Setting Up Your First Ad Block: A Simple Walkthrough
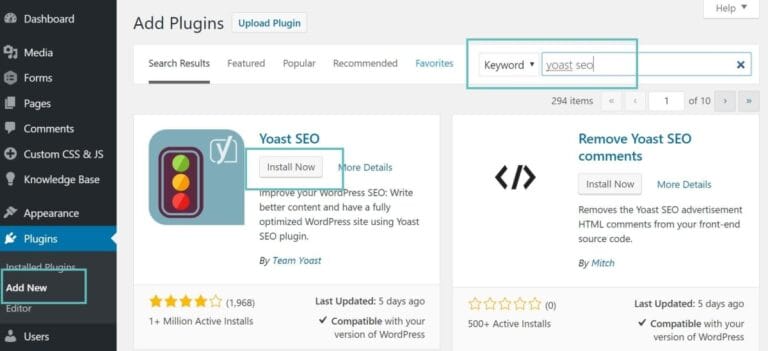
Alright, let’s get down to business and set up your very first ad block using the ad Inserter plugin. First, make sure you have the plugin installed and activated on your WordPress site. If you haven’t done that yet, just head to the Plugins section, hit “Add New,” and search for “Ad Inserter.” Once you find it, click “Install” and then “Activate.” Easy peasy!
Now that you’ve got the plugin ready to roll, navigate to the Ad Inserter settings in your dashboard. You’ll see around 16 blocks ready for you to fill in with your ads. Each of these blocks can hold a different ad, so you’ve got plenty of space. start by picking a block—let’s say Block 1.Here’s where the fun begins! You can add a simple HTML ad code, a piece of JavaScript, or even just a plain old text ad. Just paste it into the box!
Next up,it’s time to choose where you want those ads to show up. Below the block where you pasted your ad code, you’ll see options for placement. You can decide to display it before or after your posts, in the sidebar, or even in your footer. Just tick the box next to your preferred options. It’s pretty flexible, so you can really customize how and where your ads pop up.
If you want to get fancy, you can also set specific conditions for showing ads. For example, you can choose to only show ads on certain categories or pages. To do this, scroll down to the “Display Settings” section and make your selections. This way, your ads will only appear where you want them to, keeping your site looking tidy and user-friendly!
Mastering Ad Placement: Tips for Maximum Impact

When you’re diving into ad placement,think about where your audience will actually see them. Putting ads in spots where people usually look can seriously boost engagement. A few prime locations to consider are:
- Above the fold: This area grabs attention right away.
- Within content: Ads that blend with your text can perform better.
- After a post: When a reader finishes, they might be curious about related products or services.
We all know how important it is to keep your site looking clean. So, when you’re setting up your ads, make sure they’re not overwhelming the design or making it hard to read your content. A good trick is to stick to a consistent style that fits your website. Think about:
- Color schemes: Use colors that match your overall theme.
- Size: Keep your ads from being too large or too small. They should fit in nicely.
- Load times: Make sure your ads don’t slow down your site!
Another thing to keep in mind is testing. Don’t just throw ads up and hope for the best. Take some time to try different placements and formats to see what works best. You might want to check out the following setups:
| Placement | Performance | Notes |
|---|---|---|
| Header | High visibility | Can be ignored due to ad blindness |
| In-post | Good engagement | Should relate to the content |
| Sidebar | Moderate | Effective for offers and promotions |
Lastly, don’t forget about monitoring your ad performance. Keep an eye on your click-through rates and conversions to see what’s doing well. You might need to tweak your strategy based on the data you gather. A simple dashboard setup can help you track this information easily. Just remember, mastering ad placement is all about staying flexible and adapting to what your audience wants!
Troubleshooting Common Issues with ad Inserter
Using the Ad Inserter plugin can be a breeze, but like anything techy, you might run into a few bumps along the road.One common issue users face is ads not showing up where they’re supposed to. Before you start pulling your hair out, check a few things:
- Have you saved your settings after inserting your ad code?
- Is the ad code correct and working in a different habitat?
- Are there any caching plugins that might be causing a delay or blocking the changes?
If everything looks good and you still can’t see your ads, clear your site’s cache. Sometimes, changes just need a little nudge to show up!
Another pesky problem is ads showing in weird places. If your ads are popping up in the wrong spots, first verify your placement settings in the plugin. It’s easy to overlook where you’ve chosen to showcase them. You might have set an ad to appear after the content, but it’s landing at the top. Here’s what to do:
- Double-check your selected insertion settings (e.g., before or after paragraphs).
- See if there are any theme settings interfering with the plugin.
- Look for conflicts with other plugins that could mess with ad display.
This usually does the trick and puts your ads back in their rightful place!
Then there’s the underlying issue of ads being blocked by ad blockers. If you’re testing your ads in a browser, make sure you turn off any ad blockers while checking.Sometimes, people think the plugin isn’t working, but it’s just the blocks doing their job. You can even check how your ads look from a different browser or in incognito mode, which usually helps bypass those pesky blockers.
if you’re still struggling, check the browser console for any potential JavaScript errors. Errors can cause ads to not display correctly. To access this, right-click on your page, click ‘Inspect,’ and go to the ‘Console’ tab. It’s a no-fuss way to see if there are any big red flags. If you spot any, you may need some help troubleshooting it further, either by checking online forums or reaching out to support. Don’t hesitate to ask for help when you need it!
Exploring Advanced Features for Better Control over Your Ads

Once you’ve got the basics of the Ad Inserter plugin down, it’s time to dig into some of its more advanced features. This can help you boost your ad performance and make the most out of your website traffic. One cool thing you can do is use conditional display rules.Instead of just tossing ads on random pages, you can set conditions so ads show up only where they make sense, like on specific posts or categories. This targeted approach means you’re serving ads to the right audience, improving your chances of clicks.
Another neat feature is the ability to rotate multiple ads in one spot. If you’ve got a collection of ads you want to show off, Ad Inserter lets you rotate them automatically.Just imagine, instead of having the same ad plastered on every page, your visitors get to see different options every time they refresh or navigate—keeping things fresh and increasing engagement. You can set up how frequently enough each ad appears too, making it super easy to experiment with different creatives.
Custom code placement is also a major win. The plugin gives you the ability to insert custom HTML or JavaScript anywhere in your content.This is especially handy if you’re working with tracking scripts or third-party widgets. You can place this code in different sections,like the header or footer,or even in between paragraphs. With just a few clicks, you’re ensuring everything’s working seamlessly together, without needing to get too technical.
If you ever want to see how your ads are performing,the built-in statistics dashboard is a must-check. It keeps track of each ad’s impressions and clicks, so you can see what’s working and what might need a little tweaking. Over time, you can gather insights and make data-driven decisions to refine your ad strategy. With all this info at your fingertips, managing your ad spaces becomes a whole lot easier!
Q&A
Q&A: Easy Guide to Using the Ad Inserter Plugin on WordPress
Q: What is the Ad Inserter plugin, and why should I use it?
A: The ad Inserter plugin is a handy tool for WordPress users who want to easily add ads to their site. Whether you’re looking to make some extra cash from ads or just want to promote your own products, this plugin makes it simple to manage ad placements without getting into messy code.
Q: Is it hard to set up the Ad Inserter plugin?
A: Nope! Setting up Ad Inserter is a breeze.Once you install the plugin, you just need to activate it, and you’re good to go. There’s a bit of setup involved, like choosing where you want your ads to show up, but the interface is pretty user-friendly.
Q: Can I use different types of ads with this plugin?
A: Definitely! You can use a variety of ad types, like Google adsense, custom HTML ads, or even affiliate links. Ad Inserter lets you choose what type of ad you want to run and how you want to display it.
Q: How do I add my ads to the plugin?
A: To add ads, you’ll need to go to the Ad inserter settings in your WordPress dashboard. You can paste your ad code right into the provided boxes. It’s as simple as copy and paste!
Q: What about ad placement? Where can I put my ads?
A: You’ve got options! Ad Inserter allows you to insert ads in different places like before or after your posts, in the sidebar, or even between paragraphs.You can play around with the placement until you find what works best for your site.
Q: Can I control how many ads show up on my site?
A: Yes, you can! The plugin lets you disable ads for specific posts or pages if you want to keep certain content ad-free. You can also limit the number of ads shown per page, which can help keep your site from getting overcrowded.
Q: Is there a way to track how well my ads are doing?
A: While Ad Inserter doesn’t have built-in tracking, you can use other tools like google Analytics to monitor clicks and impressions. Just make sure you’re using UTM parameters or whatever tracking options your ad provider offers.
Q: Is the Ad Inserter plugin free?
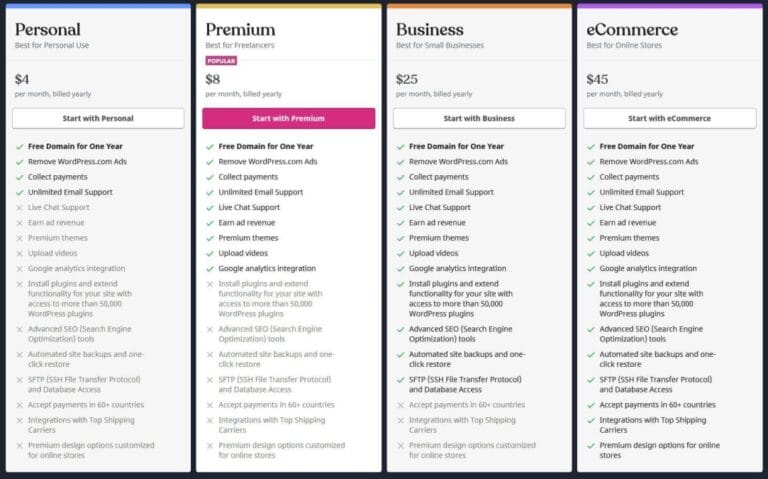
A: There’s a free version with plenty of features, which is great for most folks. they also offer a premium version if you need more advanced options, but you can definitely get by with the free version if you’re just starting out.
Q: Can I customize the look of my ads?
A: Yes! While the actual ad design has to come from the ad provider (like Google), you can customize how they’re displayed on your site with CSS.This can definitely help you ensure your ads match your site’s vibe.
Q: Any tips for using the Ad Inserter plugin effectively?
A: Sure! Keep an eye on your ad placements and adjust them based on how they perform. also, don’t overload your site with ads—too many can turn off visitors. Aim for a balance that earns you money but still provides a good user experience.Q: Is there support available if I run into trouble?
A: Absolutely! The Ad Inserter plugin has a good support community, plus you can find tons of tutorials and guides online. If you hit a snag, you’ve got options to get help!
Hopefully, this Q&A gives you a clearer picture of how the ad Inserter plugin works and how you can make it work for you! Happy ad insertin’!
In Retrospect
And there you have it! You’re now equipped with all the basics for using the Ad Inserter plugin on your WordPress site. Whether you’re aiming to boost your blog’s revenue or simply want to promote your own content, this handy tool has got your back. Remember, it’s all about finding the right balance. Too many ads can push people away, while the right amount can definitely help you keep the lights on. So,take your time,play around with the settings,and watch as your site transforms. If you run into any snags or have questions,don’t hesitate to dive into the support forums or drop a comment below.happy inserting, and here’s to making your website work for you!